Friday, December 12, 2014

Making Progress, But Not Really

I'm sorry to be the bearer of bad news but I haven't achieved my first deliverable yet. By now I was hoping to have all the mechanical parts for my 3-D printer but unfortunately that has yet to happen. I am planning on ordering parts in the next couple days, as well as going to the hardware store to get the threaded rods, nuts, bolts, and a few other things.
The frame I am going to use.

I have still been working on my project. I spent the past few days contacting the sellers of the various parts about compatibility and the best type of frame. I have decided to purchase this frame from eBay. I chose this one over the other do to cost and stability. After speaking with the seller I decided I am going to purchase this set of printed parts as the seller of my frame. I still need to research the bearings and couplings that I need. If everything goes to plan I should have all my parts together by the new year.
Picture of Pallet Table
The inspiration for my table
Side Project: Table
As I was researching the printer I saw many people complain about the instability of a single plate frame. That's one of the reasons I chose the melamine frame above. A common tip of the people who build these is to have a stable place to build and operate there printer on. Stability is key for good prints and proper calibration. Since I don't have a large table that I can build my printer on I decided to build one. As I was browsing the internet I saw a table like what I was planning on building.

The table that I have pictured is built out of old pallets, you know the things forklifts pickup at Costco. This is a big plus for me as it puts my cost at zero because many businesses throw them out. Im planning to get mine from a copier store.

My table will be different from the one pictured. I'm planning on making it about 5 feet by 3 feet. This should get me plenty of space to build it. I think I am going to lay the slats on top of a piece of particle board, glue them down, than sand, stain and seal. I'm probably going to make the legs out of the 2x4s the pallets come sitting on top of. I might also route out a lip on the top edge so that I have somewhere to put parts without it rolling away. I'll be sure to update my progress, Hopefully next time I'll have made some progress on the printer.

Friday, December 5, 2014

Another Reason Why America Isn't So Great After All!

The parts list for nuts and bolts. Notice they are all metric
 As I was reading the parts list on the 3-d printer's website I noticed another challenge to add to my project, everything is metric. Since these printers are built all around the world, it only makes sense to use this system, after all there are only 3 countries who don't (The United States, Myanmar, and Liberia in case you were wondering. This also adds more difficulty in finding parts locally. The rods that are used in the printer are metric, M10 to be specific. These rods are harder to find, I have only seen them at Ace Hardware.
Everything I own is standard

Since I was raised here in the United States, all the things I have built, the wood I have bought, or the things I have put together have been in standard measurement. All of the tools I own count in fractions of inches, which is 1/12th of a foot, which is 1/3rd of a yard and so on. Although this system is completely irrational it is what makes sense to me. The printer however uses a rational system with base 10. Since the printer needs to be put to together with great precision I have two options, convert every measurement to standard and end up with ridiculous fractions, or buy metric measurement devices.

I will most likely go with the latter, but I don't no where to get a metric tape measure or meter-stick. They might have them at Home Depot or Lowes. If not I will have to take advantage of my free 2-day shipping from Amazon.

The other parts In the build like the nuts and bolts will not be as much of a problem as the measuring, cutting, temperature and so on. I know you can get most of the hardware at big box stores and most standard wrenches are close enough to work. Hopefully this will be about as dull as my blog posts get, I haven't made groundbreaking progress yet.

Friday, November 21, 2014

Dollars and cents

What my printer will look like in the end, hopefully.
After many hours of research I have decided to build the Reprap Prusa I3 (Prusa i3 here after). I chose this 3-d printer over my countless other models for numerous reasons. To begin it has a large print are (8"x8"x8") which was a major factor in deciding which model to build. With a printer this size most practical things can be made. Another reason I selected this printer is its ease of getting parts. Kits, as well as individual parts are readily available on many major online retailers, including Amazon.com and Ebay.com. A bonus of this printer is the network of support available online. It is one of the most popular 3-d printers to build and consequently many step by step manuals and videos are available.


Specifications of the Prusa I3
·         Plastic Parts- 26
·         Other Parts- 337
·         Frame Material- Aluminum
·         Cost- $300-$400
·         Print size- 8"x8"x8"
·         Print Speed- 100mm/s
·         Plastic Types- PLA or ABS
·         Motors- NEMA 17 Stepper Motors


Sourcing the Parts
With the exception of the threaded rods, nuts, and bolts 3-d printer parts are scarce locally. Upon researching for parts I found that the best and most trusted places to source parts from is Amazon.com and Ebay.com. A variety of sellers offer good selection on both of these websites.
Pros
Amazon- Reputable website with good customer service. My Amazon Prime membership merits free 2-day shipping on most items.
Ebay-Cheaper parts than Amazon, trusted by many for 3-d printer parts.

Cons
Amazon- Higher prices, may not have as good of selection
Ebay- Various sellers, various shipping prices and times


Below is a chart representing the lowest cost on the websites.  Note: Prices include shipping as well as the combined price of the quantity of the products listed.
Parts

Amazon Price

EBay Price


Frame:


Printed Parts

$50

$30
Rods

$74.99

$40
Hardware

$17

$25
Aluminum Portion

      Not Available

$80
Bearings

$18

$12
Belts

$12

                  P-$89.99
Electronics


NEMA 17

$83.40

$70.00
RAMPS 1.4

                 P-79.95

                               P
Arduino Mega R3

                           P

                               P
Hot end

$34.99

$28.99
End stops

$6.99

                               P
Heated Bed

$18.99

                               P
Power Supply

$29.99

$30
Motor Drivers

                             P

                                P
Optional LCD

                             P

                                P


Total:

       $346+Frame

$315.99


P= Package


I may end up taking parts from both retailers based on time for shipping or reputability. I would also like to point out my biggest fear for this project. Spending all of this money for a pile of wire and metal that just sits there.

About Me!

I would like to get this out of the way. I am not much of a writer so this blog may come as a disappointment. That being said, Welcome to my blog!

To begin my name is Garrett. This blog, as much as I dislike writing, will hopefully by a all encompassing view in to my experiences building a 3-d Printer for the 20% project. Since I don't have very much other information about myself that is worth mentioning here are some facts about me.

Favorite QuoteOur greatest weakness lies in giving up. The most certain way to succeed is always to try just one more time.
Favorite Sports Team- Florida State, and no I didn't just jump on the bandwagon.
Monarchy Rank- Peasant (don't ask)
Grade- 10th
Other things you may need to know- I am a very excellent procrastinator, evident by the fact I'm writing this less than a hour before it's due. I am the youngest person in my family. I despise rap music.
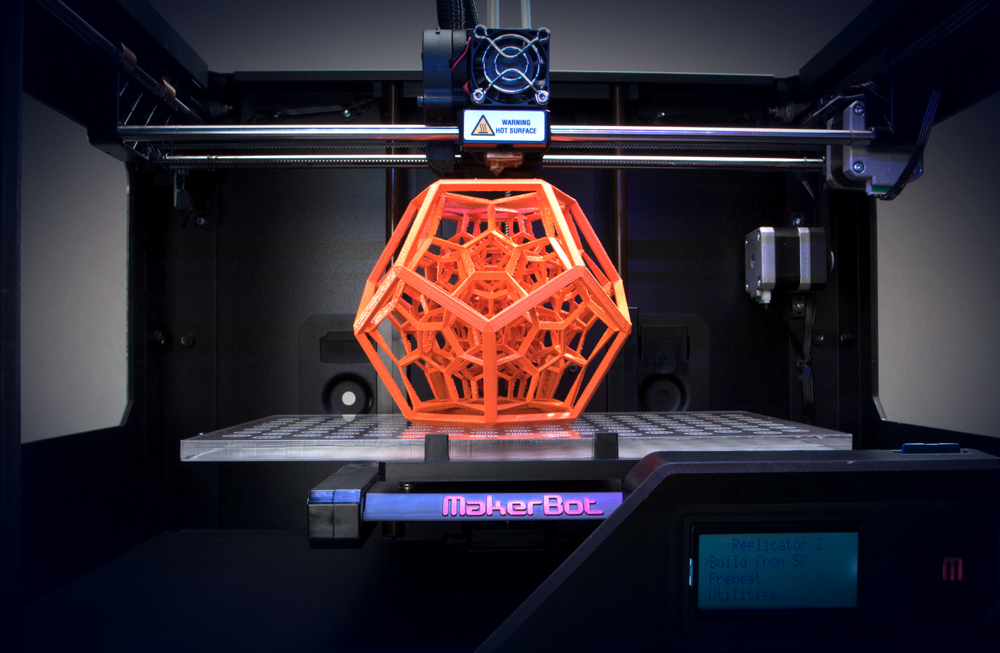
Now that we have gotten through the portion of the blog about my exciting life let my introduce my project. My goal by April is to build a 3-d printer. You might ask what that even is but instead of boring you with various technical talk and monotonous reading here is a picture of how a 3-d printer works.
A 3-d printer with a completed infinite pentagon.
Basically a 3-d printer takes a long piece of plastic, the "ink" of a regular printer, melts it, and stacks multiple layers on top of each other to make a shape. 
The various colors of "ink" of a 3-D printer
With these printers you can make anything your mind, or someone else can conceive. This s what drew me into doing this. The main reason I choose to build rather than buy is both so I can learn, as this project includes electronics, software, mechanics and much more, as well as cost. My plan is to keep the whole project under $350. This amount of money does not seem much to me for the possibilities I see opening up with a 3-d printer.

Although other people are just writing books for there projects, or putting on a concert, I wanted to do something I thought I would enjoy.

Note: I am not very good at endings.