Friday, February 20, 2015

On the road again...

Once again I didn't quite make my deliverable (A completed 3-D printer). However I am closing in on that goal. Right now I am about 75
Printer so far, notice the motors.
% done with the mechanical construction of the frame. I have added the motors and the end-stops, as well as all the X,Y, and Z axis.

I still have to put the belt on the pulleys attached to the motors, make sure everything is properly aligned, a herculean task in itself, assemble the extruder, wire everything together, upload some code and get printing! That may seem like a lot, which it is, but most of it is what you may call "busy work", it just takes time. I have already set apart Sunday as a build day to hopefully finish things up.

That leads me to the past weeks progress. I received my electronics package on Tuesday with the parts to get me going again. This package contained the end-stops, heated bed, Arduino, Ramps 1.4, and belts as well as a few other wires and things. I immediately ran into a problem. The endstops I received had the mounting
The whit part in the picture was the issue.
holes under the wiring harness. Turns out it is impossible to plug something in when there is two giant bolts sticking out of the top. Luckily after some internet searching I found a solution. I had to precariously bend the contacts enough to get the bolt through the opposite way, without breaking anything. (See Picture). This proved to be taxing as I didn't want to break anything and have to buy more parts.

My next issue was with the bearings. They were supposed to fit nicely in the holder and slide freely. They instead decided to bind against the steel so much that you couldn't pull on them without the whole printer moving (at least 15 Lbs). I shaved some of the plastic and the problem was solved.

Final note: I bought my hot hot end end today, the last needed part!
The LCD controller


Friday, February 13, 2015

At a Standstill


Parts
Over the past week I received a few more parts for the printer namely the:
Raspberry Pi
  • Printed Parts
  • Mounting Plate
  • Couplings
  • Motors 
  • Raspberry Pi (A small computer for Wi-Fi 3-D printing, also a regular computer unto which I am typing this post right now)
I am still waiting on the electronics which has led me to a halt in assembly

Progress
Completed X-Axis
Since I finally got all of the parts I needed to begin my assembly I got started tuesday night. The first step was the x-axis which depending on your perspective is the "to and fro" of the motion. I had to start with zip tying bearings (metal slides) onto the heated bed mount (holds the part being printed). After that I started the process of using the metal rods. This was a lot easier than I thought it would be. Most of it was taking the rods, pushing them through plastic pieces
Heated Bed Assembly
, and adding a washer and nut. Some of the plastic pieces had small string of plastic hanging in there gaps that had to be removed. The leftover strings gave me a idea of how small of detail I can have. According to my calipers these parts were printed with a .35 mm diameter, pretty small if you ask me. Then came adding the smooth rods. It appeared to be a easy process, just snap them into place. This was easier  said then done. Apparently you can't fit a 8 mm rod into a 7 mm hole. At the website suggestion I got a hair dryer and heated up the plastic parts. These resulted in the parts shrinking giving just enough room to slide the rods in. I slid the heated bed assembly on and the x-axis was done. I took some time to snap together the frame to see how big the footprint would be of the completed printer, it is comparable able to a milk crate. I then started putting together the Y axis. Again I inserted bearings into there holders, and had to use heat to get them in. I added the nuts used to help the carriage move up and down. This leads me to where I am now. I am waiting to get my electronics, which contains the en end-stops. My directions say to go ahead and add them in. I didn't want to be in  difficult place later, so I am delaying until I get them. According to there tracking they are between New Hampshire and here.

Assembly table 
I had originally planned to build a whole desk out of pallet wood, but the wood  kept breaking no matter how gently I pulled them apart. Instead I am using a card table, and a tool holder/riser to hold my TV with build instructions on my Raspberry Pi as well as tool holder. Side note: Broken pallet boards are great for for or bonfires.
Assembly Table

Thursday, February 5, 2015

First Parts!

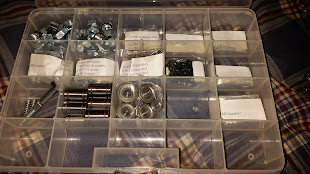
Although this is severely late I finally received my first parts! On Saturday I received my frame kit from Nevada. This contained the frame, rods, nuts and bolts, and other parts for mechanical Assembly. This day had been much anticipated. When it got here I learned two things.


Photo
Nuts and bolts
1) This is a lot smaller than I thought it was going to be. Pictures you see on the internet often dont have indicators of size to reference, just a number. This small size may lead to tighter working area and tighter tolerances in the parts. We'll see if that has a impact later.


2) Its going to be heavy when it's done. The frame and hardware weighs 12 pounds alone. 5 pounds for the motors, 5 for the electronics, 3 for the power supply... This weight combined with its bulk, although still manageable, will make the printer a little harder to move around.

Photo
Ruler for Frame Scale
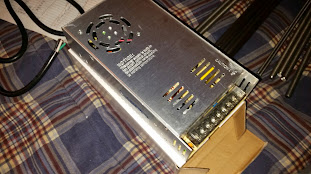
The other part I received was the power supply. It was most economical to get it off of Amazon. I wanted to get a quality product to prevent power issues later, as well as wanting something that plugs into my wall to be safe.

I went ahead and ordered the rest of the parts I needed for my 3-D printer except for the hotend. I want to see my pasrts before I ordered it to make sure it will fit, as there are many types of these in many different sizes. The rest of my orders current states are as follows:

Electronics-Not yet shipped, have tracking number, estimated delivery date 2/12-2/16

Couplings & Hot End mounting plate- Not yet shipped, have tracking number

Printed Parts- Departed Santa Clarita, CA a day ago. Estimated delivery 2/5-2/10

Motors- Departed Elk Grove Village, IL today.

Most of my orders are coming from USPS with the exception of my cooling fan which is somewhere between here and China.

A note on motors

When I was researching which motors to buy I came across a interesting prospect. A set of 5 motors are available on both Amazon and Ebay, with the same picture and specifications. I did a little digging and found that they are the same seller using two different mediums. I ended up purchasing off of Ebay because of the significance of the cost difference. I wan't planning on buying my motors on Ebay but the reviews on amazon for this product were all positive. Hopefully I get the same quality product as described.
Photo
Power Supply

Photo
Rods for the printer


Friday, January 30, 2015

Change of Plans


Tonight I was supposed to be showing you all these wonderful pictures of my completed mechanical frame for my 3-D printer. Unfortunately that will not happen for two reasons:

1) I am a little behind schedule and all the parts for the mechanical frame will not get here until tomorrow

2) I was reading more into the assembly of the printer and have come to realize that mechanical assembly and electronic assembly happen at the same time, you can't do one half and the other half later.

That being said I have to alter my deliverable schedule slightly:

New Deliverable times:


February 20 Deliverable
Printer mostly assembled and ready for testing

March 13 Deliverable
Complete the Software portion of the build and Calibrate the printer

April 10 Deliverable
A complete fully operational 3-D printer

I still have been getting things ordered for the printer. I have ordered most electronics including:

1x 40mm cooling fan, will get here sometime in February from China. 

gi-b-12V-2-Pin-40mm-Computer-Cooler-Cooling-Fan-PC-Black-F
My little fan coming across the Pacific
Electronics Kit:
Ramps-1-4-A4988-Mega2560-R3-LCD-12864-3D-Printer-Controller-Kit-For-RepRap
This kit includes:
  • Ramps 1.4 (The small red thing)
  • Arduino Mega (The blue thing)
  • LCD Controller (Not Necessary but a nice extra)
  • GT2 Belt
  • Heated Bed
  • End stops
  • Stepper Drivers
  • Usb Cable
  • Software Disc
This leaves only a few parts left for me to get including:
  • Power Supply
  • Motors
  • Hot end
  • Printed Parts
Everything else has been ordered and is making its way across the country. Currently I have parts coming from New Hampshire, Nevada, and China. Once I get the other few things I will begin assembly on the printer.

One last note, the printed parts I still need to get come in many color4s and am still trying to make up my mind on what to pick.

Friday, January 23, 2015

The Electronics


Now that I have the mechanical components taken care off it's time to begin getting the electronics for the printer together. In my previous post I discussed the various parts off the printer, including the electronics. Specifically these parts include:

5x NEMA 17 Stepper motors- These make the axis' move up, down, right, and left.

5x Motor Drivers- These provide heat sinks to prevent motors from overheating.

3x End stops- These provide data to the controller so to indicate extruder position.

1x Arduino Mega- This micro-controller turns computer signals into motion.

1x Ramps 1.4- This is a "shield" for the Arduino that translates signals to motion, what you plug components into.

1x Power Supply- Provides the necessary power to drive all the components

1x Heated Bed- Provides better prints by allowing the parts to cool faster.

1x Hotend- Melts the plastic for printing

*Parts below are considered optional
1x Raspberry Pi- This would allow me to print through WiFi as well as allow me to add a webcam to monitor my prints when I'm away.

1x Smart printer controller with LCD- The screen on this unit allows me to control the printer, upload files, and monitor conditions without a separate computer.
A wiring diagram with all the electronics
Where will you get the parts?
As I described in my first post most of the electronic controllers will be bought in the form of a bundle to save money. From what I have seen a electronics kit including the heated bed, LCD, Ramps 1.4, Arduino Mega, endtsops, and motor drivers as well as the belt to finish mechanical construction are available from various sellers for $89.99.  The power supply I will source from Amazon for the modest price of around $20. The hotend I purchase will depend on my extruder but most likely that will cost around $25 and be sourced from Ebay.

Friday, January 9, 2015

Parts of a 3-D Printer

Since I keep throwing around the idea of 3-D printing, and its applications, as well as the process of building one, but haven't really discussed how they work or there parts. In doing this I hope that it will be easier to understand the topics I discuss in my blog.


A basic explanation on how a 3-D printer works
The process of printing a objects begins with designing a item in a 3-D modeling program such as Blender or downloading a file from the internet. This item is represented as a whole object so you have to get it into g-code to send to the printer. G-code splits the object into hundreds or thousands of layers of 2 dimensional shapes that stack together on the printer to create the object. This code is then sent to the 3-d printer driver.

Frame- For my 3D printer I am using a melamine or acrylic frame that us bolted together with metal rods. These rods transfer motion from the stepper motors to the extruder or hot end.

Printer Control Board- This board transfer the g-code to the motors. The board tells how many steps the motors need to take, the extruder speed, the hot end temperature, the heated bed temperature and much more. All of the electronic components are connected to this.

Extruder- This part of the printer is supported on the printers gantry. It pushes the filament through the hot end to be melted into a object. I currently plan on using a single extruder but may evolve to a dual extruder later on to print two colors at once. Thats the great thing about having a 3-D printer, you can improve it however you want!

Filament- This is the source of your printers object. Since spontaneous creation is still impossible the material has to come from somewhere. Typically packaged on a continuous roll and available i hundreds of colors and materials filament decides what your objects will be made of.

Motors- These motors, NEMA 17 stepper motors in my case, control all of the motion on the printer. Upon each electrical signal they move one step, 1.8°. The motors have to work in sync, all 4 of the motors required for motion to have a successful and accurate print.

Heated Bed- Although considered a optional component a heated bed is one of the best upgrades o make to your printer. Having one allows to print in more materials as the can keep the parts warm enough to melt together without cracking. The bed heats glass that the pieces are printed on.

I hope that this has helped you have a deeper understanding in the components of 3-D printing.
A quick video description from CNN is available here.

Look for more on the electronics next week.

Monday, January 5, 2015

Not Much Progress

Progress on the 3-D Printer

Unfortunately I didn't make huge strides towards my 3-D printer. I spent my time doing some more research on parts kits. For financial and availability reasons I have chosen to order a kit containing the parts needed for the mechanical portion of the printer. By ordering a kit I can get all the parts I cannot find locally as well as for around $50 less than buying individual parts. This also ensures that the parts will work together. The kit I am looking at purchasing comes with the rods, hardware, bearings, and frame. It appears I will need to purchase the 3-D printed parts separate even though the description says otherwise. I am planning on purchasing the required mechanical parts tomorrow (1/6/15) and they will take a few days to get here from Las Vegas, Nevada.

The Table

I mentioned in a earlier post that I was going to get some pallets to build a new desk/table out of to build my printer on. I was fortunate to find some little used pallets to use for my project. I began by taking the pallets apart. Although they are made to just carry copiers and other such items they are built to last. This can be difficult since my goal is to take them apart for there wood. For my pallets the choose to put two inches of board together with a 3 inch hybrid nail and then bang the extra into the wood. So for each board I had to first get the nail out of the wood with a screwdriver and a sharpened railroad spike. This resulted in my screwdriver breaking, a testament to the pallets strength. While doing this some of the boards split. I have since glued and clamped them together. After thats done I will join the boards together on top of some OSB. If all goes to plan I will have my completed tabletop by Friday ready to find some legs.